


Published: 12.07.2025
See moreIndustrial Dehumidifier Kosmen Maintenance Guide
 Kosmen Đà Nẵng
 Published:
14/07/2025, 14:00
- Updated at 14/07/2025, 14:10
Published:
14/07/2025, 14:00
- Updated at 14/07/2025, 14:10An industrial dehumidifier is a vital device for maintaining ideal humidity levels in production environments. Like other electronic devices, regular maintenance is essential to ensure optimal performance and prolong the machine's lifespan. Over time, dust accumulation can reduce dehumidifying efficiency, increase power consumption, and lead to malfunction. This article provides step-by-step maintenance instructions and important usage tips.
1. Periodic Maintenance Guide
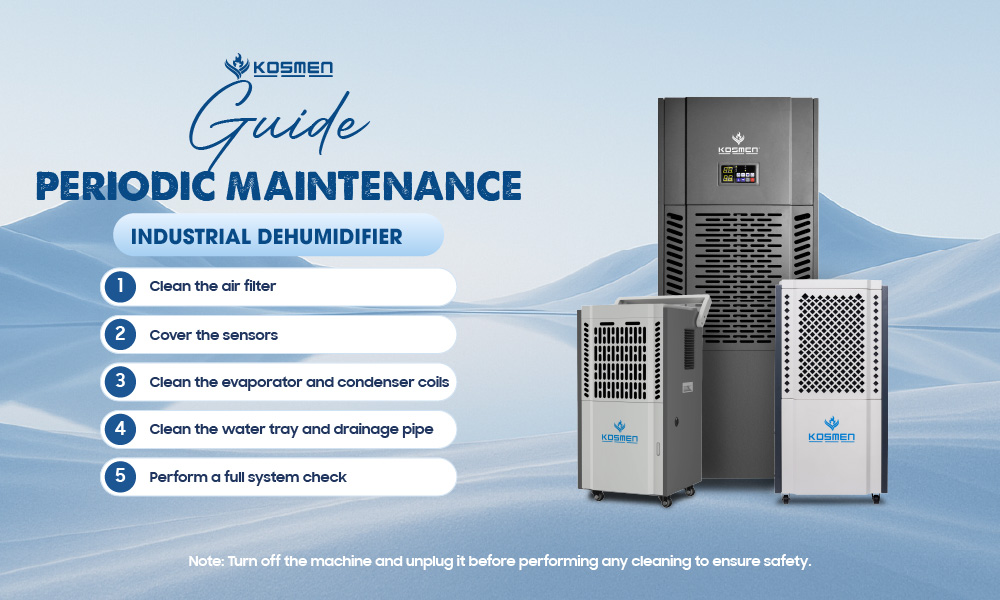
Note: Always turn off the machine and unplug it before starting any cleaning process to ensure safety.
Basic Maintenance Steps:
Step 1: Clean the air filter – This is the part that accumulates the most dust and directly affects airflow into the machine. It should be removed and cleaned regularly using clean water or a vacuum cleaner.
Step 2: Protect the sensors – Cover the sensors during cleaning to prevent water or physical impact from damaging them.
Step 3: Clean the evaporator and condenser coils – Use water to remove accumulated dust, grease, and mold. This helps improve heat exchange efficiency and ensures clean air output.
Step 4: Clean the water tray, drain pump, and drain hose – Make sure wastewater drains properly to avoid odor buildup or issues affecting the machine.
Step 5: General inspection – A technician team should check components such as the compressor, fan motor, thermal relay, and capacitor to ensure the machine runs smoothly and reliably.
Industrial Dehumidifier Maintenance Guide in Just 5 Easy Steps
Notes When Performing Maintenance on Industrial Dehumidifiers
To keep the dehumidifier operating efficiently, users should clean basic components regularly every 1–2 months. However, for more advanced technical tasks, it is essential to have support from professional technicians to ensure safety and prolong the device’s lifespan.
Below are the components customers can clean themselves:
Cleaning the pre-filter:
- Remove the filter from the machine.
- Use a vacuum cleaner or rinse with water (for washable filter types).
- Allow it to dry completely before reinstalling.
- Clean every 1–3 months depending on dust levels in the environment.
Cleaning the water tank (Applicable for Kosmen KM-90S):
- Unplug the machine and remove the water tank.
- Empty the tank, then rinse with water and mild soap.
- Dry thoroughly to prevent mold, then reattach it properly.
Wiping the machine’s exterior:
- Use a soft damp cloth to wipe off dust and dirt from the outer casing.
- Avoid using harsh cleaning chemicals.
Cleaning the water tray, drain hose, and drain pump (if applicable):
- Gently check and clean to avoid clogs in the drainage system.
- Ensure water drains smoothly without causing odor or leakage.
Components that require professional technician service:
- Cleaning the evaporator and condenser coils: These are critical heat exchange parts that require precise handling. Do not disassemble or spray water on them, as it may damage internal electrical components.
- Protecting the sensors: During deep cleaning, technicians will cover the temperature and humidity sensors to prevent damage.
- Full system inspection: Includes checking the compressor, fan motor, thermal relay, capacitor, control board, etc., to detect and resolve potential issues early.
Recommendation:
Perform deep maintenance every 6 months or follow the service schedule from the warranty center to ensure your dehumidifier operates efficiently, saves energy, and maintains long-term durability.
2. Routine Maintenance Schedule
Component | Every 1–3 Months | Every 12 Months |
Air Filter | Clean the filter | |
Compressor | Check vibration and operating temperature | Check electrical cables for damage or looseness |
Heat Exchanger | Clean ducts and accessories | Clean evaporator and condenser thoroughly |
Fan | Check operation and noise levels | Lubricate, balance as needed |
Seal | Check for cracks | Replace if worn or cracked |
Thermostat | Test temperature and humidity sensors | |
Sensor | Wipe with dry cloth | Calibrate or replace if inaccurate |
3. Important Notes – Please Read Carefully
Installation Guidelines:
- Place the machine upright on a flat, stable surface.
- Maintain minimum clearance: 30cm from walls or heat sources, 80cm at the air intake, and 300cm at the air outlet.
- Do not block air intake or exhaust.
Electrical Connection Guidelines:
- Must be installed by a qualified technician and comply with local electrical standards.
- Do not exceed the rated voltage/frequency listed on the label.
- Power supply variation should not exceed ±10%.
- A circuit breaker and grounding are required.
- Use a fuse rated 10A–16A / 250V and standard electrical cables. Do not use damaged cords.
4. Usage Precautions
Placement and Conditions:
- For indoor use only. Do not use inside cars, boats, or closets.
- After transporting or cleaning, let the machine stand for 1 hour before plugging it in.
Electrical Safety:
- Do not share the power outlet with high-power appliances.
- Avoid strong impacts or dropping the machine.
- Do not unplug while the machine is operating; always turn it off via the control panel first.
Things to Avoid:
- Do not spray water, flammable chemicals, or insecticides on the machine.
- Do not immerse the machine in water or place it in excessively damp areas.
For Children and the Elderly:
- Children above 8 years old and elderly individuals may use the machine under supervision.
- Do not allow children to play with or clean the machine unsupervised.
5. Error Code Explanation
Error Code Meaning Solution
| E1 | The ambient temperature sensor is malfunctioning. | Replace the temperature sensor to resume normal operation. |
| E2 | The ambient humidity sensor is malfunctioning. | Replace the humidity sensor to allow accurate humidity detection and control. |
| E3 | Phase sequence error, phase loss, or incorrect power line connection. (This error does not apply to 220V units and typically occurs with industrial models.) | Contact your supplier to check and correct the power phase sequence. |
| E4 | Wastewater tank is full. | Remove the tank, empty the water, and reinstall it properly. |
| E5 | High voltage protection is activated. | Contact your supplier to check the refrigerant (gas) pressure. |
| E6 | Low voltage protection is activated. | Contact your supplier to check the refrigerant (gas) pressure. |
| HI | Ambient humidity is too high (above 95%). | Ensure all doors and windows are properly closed. |
| LO | Ambient humidity is too low (below 30%). | It is not recommended to use the dehumidifier at this time. Turn off the unit and restart it when necessary. |
| HL | Ambient temperature is too high or too low. | Use the dehumidifier only within the temperature range of 5°C to 38°C. |
6. Troubleshooting Guide
Issue | Cause | Solution |
Machine does not operate | Power loss, blown fuse, full tank | Check power, replace fuse, empty tank |
Low dehumidifying performance | Wrong settings, blockage, extreme temperature | Adjust settings, remove obstacles, close windows |
Not dehumidifying on restart | Compressor protection delay | Wait 3 minutes, then restart |
Water leakage | Loose or clogged drain hose | Tighten and clean the drainage system |
Condensation on casing | High ambient temperature and humidity | Normal – unit will defrost automatically |
Slight vibration on start/stop | Mechanical movement during switching | Normal phenomenon |
Contact Support:
- Head Office: No. 27B, Street No.12, Hiep Binh Ward, Ho Chi Minh City
- Hanoi Office: NV 4.7, Cau Buou New Urban Area, Thanh Liet Ward, Hanoi City
- Da Nang Office: No. 41 Vo An Ninh Street, Hoa Xuan Ward, Da Nang City
- Da Lat Office: No. 38/7 Ba Thang Hai Alley, Xuan Huong Ward - Da Lat, Lam Dong Province
- Hotlines: Northern Region: 0766 899 799 - Southern Region: 0965 210 874 - Central Highlands: 0961 061 076 - 0935 696 695 (Central Vietnam)
- Website: kosmen.com.vn
Share the article


Related news
